Guion del blog de curso de Objetive-C para IOS – DIA 17
—————————————————————————–
Vamos a ver ahora, como crear el contenido de un Table View, de forma dinámica, así como al pinchar en un elemento, que se vea un detalle del mismo.
Para eso, creamos un nuevo proyecto, del tipo «master view detail», y usamos storyboart y ARC
Nos vamos al StoryBoard
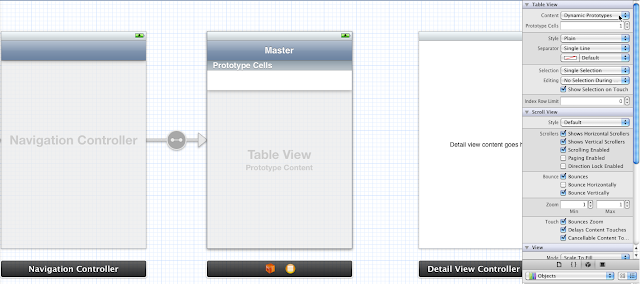
Seleccionamos la Master View Controller, en el panel de la izquierda seleccionamos la TableView. En el inspector a la derecha cambiamos la propiedad Content a Dynamic Prototypes
Esto nos va a permitir, poder rellenar la tabla mediante codigo de programacion, haciendo asi todo mucho mas dinamico
Voy a cambiar la configuracion de la celda. Para eso, pincho en el prototipo de la celda, y en style, le pongo BASIC, y le doy un identificador propio, que sera miCelda
Vamos ahora con la programacion. Vamos a crearnos un vector con los diferentes elementos que queremos mostrar en el table view. Sera un vector de Strings.
Para eso, vamos al MasterViewController.h
————————————————–
Esto podria quedar asi:
//
// MasterViewController.h
// Diario017
//
// Created by david fraj blesa on 25/06/12.
// Copyright (c) 2012 __MyCompanyName__. All rights reserved.
//
#import <UIKit/UIKit.h>
@interface MasterViewController : UITableViewController
@property (strong) NSMutableArray *miVector;
@end
Ahora, vamos al MasterViewController.m
————————————————–
Os pongo el codigo de como quedara. Fijaos bien en los comentarios
//
// MasterViewController.m
// Diario017
//
// Created by david fraj blesa on 25/06/12.
// Copyright (c) 2012 __MyCompanyName__. All rights reserved.
//
#import «MasterViewController.h»
@implementation MasterViewController
//Añadido por DAVID: CREAMOS LOS GETTERS Y SETTERS
@synthesize miVector;
– (void)awakeFromNib
{
[super awakeFromNib];
}
– (void)didReceiveMemoryWarning
{
[super didReceiveMemoryWarning];
// Release any cached data, images, etc that aren’t in use.
}
#pragma mark – View lifecycle
– (void)viewDidLoad
{
[super viewDidLoad];
// Do any additional setup after loading the view, typically from a nib.
}
– (void)viewDidUnload
{
[super viewDidUnload];
// Release any retained subviews of the main view.
// e.g. self.myOutlet = nil;
}
– (void)viewWillAppear:(BOOL)animated
{
[super viewWillAppear:animated];
}
– (void)viewDidAppear:(BOOL)animated
{
[super viewDidAppear:animated];
}
– (void)viewWillDisappear:(BOOL)animated
{
[super viewWillDisappear:animated];
}
– (void)viewDidDisappear:(BOOL)animated
{
[super viewDidDisappear:animated];
}
– (BOOL)shouldAutorotateToInterfaceOrientation:(UIInterfaceOrientation)interfaceOrientation
{
// Return YES for supported orientations
//POR DAVID FRAJ: TAPAMOS ESTA LINEA
//return (interfaceOrientation != UIInterfaceOrientationPortraitUpsideDown);
//Y ESCRIBIMOS ESTO OTRO PARA QUE PERMITA CAMBIAR DE ORIENTACION:
return YES;
}
/*
// Override to support conditional editing of the table view.
– (BOOL)tableView:(UITableView *)tableView canEditRowAtIndexPath:(NSIndexPath *)indexPath
{
// Return NO if you do not want the specified item to be editable.
return YES;
}
*/
/*
// Override to support editing the table view.
– (void)tableView:(UITableView *)tableView commitEditingStyle:(UITableViewCellEditingStyle)editingStyle forRowAtIndexPath:(NSIndexPath *)indexPath
{
if (editingStyle == UITableViewCellEditingStyleDelete) {
// Delete the row from the data source.
[tableView deleteRowsAtIndexPaths:[NSArray arrayWithObject:indexPath] withRowAnimation:UITableViewRowAnimationFade];
} else if (editingStyle == UITableViewCellEditingStyleInsert) {
// Create a new instance of the appropriate class, insert it into the array, and add a new row to the table view.
}
}
*/
/*
// Override to support rearranging the table view.
– (void)tableView:(UITableView *)tableView moveRowAtIndexPath:(NSIndexPath *)fromIndexPath toIndexPath:(NSIndexPath *)toIndexPath
{
}
*/
/*
// Override to support conditional rearranging of the table view.
– (BOOL)tableView:(UITableView *)tableView canMoveRowAtIndexPath:(NSIndexPath *)indexPath
{
// Return NO if you do not want the item to be re-orderable.
return YES;
}
*/
//POR DAVID FRAJ BLESA:
//AÑADIMOS LOS SIGUIENTES METODOS:
//NUMERO DE SECCIONES QUE QUEREMOS QUE APAREZCAN:
– (NSInteger)numberOfSectionsInTableView:(UITableView *)tableView
{
return 1;
}
//NUMERO DE FILAS, QUE SERA EL NUMERO DE ELEMENTOS DEL VECTOR
– (NSInteger)tableView:(UITableView *)tableView numberOfRowsInSection:(NSInteger)section
{
//POR DAVID: REVISAR LUEGO
//DEVOLVEMOS EL NUMERO DE ELEMENTOS
return [miVector count];
}
//QUE ES LO QUE QUEREMOS QUE APAREZCA EN CADA UNA DE LAS CELDAS
//A este metodo se le llamara, por cada uno de las filas que le hallamos dicho que tenemos justo en el metodo de arriba.
– (UITableViewCell *)tableView:(UITableView *)tableView cellForRowAtIndexPath:(NSIndexPath *)indexPath
{
//Creamos una nueva Variable de tipo celda
UITableViewCell *celda = [tableView dequeueReusableCellWithIdentifier:@»miCelda»];
//LE damos a esa celda el contenido del vector
celda.textLabel.text = [miVector objectAtIndex:indexPath.row];
return celda;
}
@end
—————————————————-
VAMOS AHORA CON EL APPDELEGATE, PARA DARLE LA INFORMACION
—————–
//
// AppDelegate.m
// Diario017
//
// Created by david fraj blesa on 25/06/12.
// Copyright (c) 2012 __MyCompanyName__. All rights reserved.
//
#import «AppDelegate.h»
//AÑADIDO POR DAVID
#import «MasterViewController.h»
@implementation AppDelegate
@synthesize window = _window;
– (BOOL)application:(UIApplication *)application didFinishLaunchingWithOptions:(NSDictionary *)launchOptions
{
//POR DAVID FRAJ BLESA:
//CREAMOS EL VECTOR CON LOS DATOS
NSMutableArray *miVectorDesdeFuera=[NSMutableArray arrayWithObjects:@»70% de Descuento», @»60% de Descuento», @»40% de Descuento», @»30% de Descuento», nil];
//Creamos una variable de tipo UINavigationController, y lo creamos pasandole un puntero desde nuestro propio rootViewController
UINavigationController *navController = (UINavigationController *) self.window.rootViewController;
//Como hemos importado desde arriba el MasterViewController, cogemos el elemento
MasterViewController *masterController = [navController.viewControllers objectAtIndex:0];
//Le asignamos al vector creado en MasterViewCOntroller, el vector creado 6 lineas arriba
masterController.miVector=miVectorDesdeFuera;
// Override point for customization after application launch.
return YES;
…..
HASTA aqui de momento hemos hemos consguido rellenar nuestra tabla. Mañana veremos como al hacer click, veremos el detalle adecuado a nuestra eleccion
————-
nota: Esto es no es curso propiamente dicho, es un diario de autoaprendizaje de objetive-c, que me sirve para afianzar conocimientos, y de paso, tener un diario de referencia, con ejemplos propios de uso del lenguaje.
————-


